A View of My Life - Quilt and Other Things

Thursday, June 29, 2017

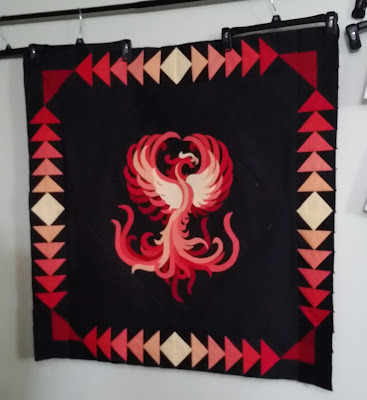
Phoenix Rising is Up

Back in May, the center section was completed. The pieces were fused down & looking good.

Note to self: When using commercial solids, you need to stitch down the raw edges.  The solids are NOT the same as hand dyed fabrics that fused hard & fast.  Do the edge stitching BEFORE you layer the quilt. DO NOT get cocky & ahead of yourself!

The first round was to add the required flying geese.

It went fairly well and I was pleased. 

The on to the second round - applique was required and it needed to reflect the sun.

I actually did this the hard way - I appliqued each of the four sides and then attached them.  What I should have done was to attached the black border strips all the way around and then laid down the sun & the rays.  The alignment would have been easier, with smoother transitions. SMH. 


It was like I was looking to make this harder than it needed to be or else half my brain was somewhere else on this project day.

Last round was all about squares & rectangles! 
Parts lined up and ready for stitching
I wanted something big & bold to balance the sun sections.  Which meant I was thisclose on some of the fabrics and had to run out and buy a bit more. 


Of course, I discovered the shortage (one yellow rectangle, 2.5 x 6 inches) while I was up in Michigan so I couldn't get the last round on  & the quilt layered while I was up there. Talk about frustrating! But that was nowhere near as frustrating as what I did when attaching the first section of the final border.

Had to laugh at my mistake!  And bust out the seam ripper. Last but not least - the corners.  I couldn't just have plain corners, now could I? Nope - all seven of the warm colors needed to make an appearance to tie everything together.  The only way to do this was square in a square in a square.  And the only way to do that was to paper piece them. 

The extra fabric I purchased was to also cover the corners. Each corner has 25 pieces in an 8 inch square. Feels like you are going round and round and round forever.

The final quilt top of Phoenix Rising.


I like the back shot, too.

The  sandwiching was done using the board method and the quilting has commenced. I'll share that in the near future.


Wednesday, June 21, 2017

Catching Up on the Solstice

Kind of ironic that I am posting about the Solstice Challenge quilt on the Summer Solstice - well, a day after actually.

Way back when, I embarked on following Pat Sloan's Solstice Challenge . In my usual style of let's take this challenge up a notch, I decided to shrink the planned 12 inch blocks down to 3 inches. Sounded good in theory, didn't it?!

As it turns out, not all the blocks were 12 inches, square or lent themselves to be shrunk down that much. What's a quilter to do?
Luckily, I was several weeks (READ: months!) behind so I could look at the project as a whole, rather than on a weekly block piece by piece.

The original plan was to make 2 of each of the 25 blocks plus 6 extra for a total of 56 blocks, set 7 wide by 8 long. Since not all of the blocks could be used, it was obvious that I would need to be a little more deliberate in my planning and layout design. This is where PowerPoint came in handy.


I could move blocks around at will, plan how many of each I needed to make and get busy at the machine. Most of the blocks were either a 9 patch or 16 patch layout so they lent themselves to the shrinking part of my idea.  Except - see the four blocks in the center column? 

That a 36 patch layout.  Fractions of 5/8s & 3/8s were used it those! They were also the only blocks with a planned color scheme and the first blocks that had the light green. As it turned out, I used the green in only two other blocks. All of the other block's color schemes were random.
Yes - that bugged the crap out of me!  I would like to do a second version of this quilt using the same fabrics but with a much more planned color placement. Really like the way I graded the background fabrics in the center column so if I make another version, I would expand on that.

Here are all the blocks laid out

with the sewing together commenced on the top two rows. A little persistence & it's a top!

While it's not quilted, it was finished being pieced before the Solstice and I'm happy I was on track time-wise!

For comparison, I borrowed this picture from Pat Sloan and her completed Solstice Challenge quilt.

Stay tuned as this will be layered using the pool noodles and then machine quilted.


Tuesday, June 20, 2017

I Have LAPTOP!


And now, FINALLY it's been switched on.  It has more memory, and is an upgrade in size. And it has Windows 10. Which I have never used before. ergh.

Really - I am not computer illiterate but the thought of starting all over with a new laptop made me nervous and unsure of myself. Or maybe I was just being silly. But this was totally me yesterday.


The keyboard will take some getting used to, as will the photo editing capability.  Just different is all. And I need to create folders and move files.  Some of that can wait, some can't.

I have been sewing and making serious progress on three projects.

To ease back into blogging, I'll start with sharing something new I learned.

While I LOVE having the wide expanse of the tile floor at the Michigan House for sandwiching quilts, I do not love scooting around on hands and knees, placing and closing 48,659,781,347 safety pins on that wonder, if unforgiving, hard as iron tile floor.


I had heard about using boards and/or pool noodles for the layering process. I hunted down some online videos to fill in the details and set about securing the necessary equipment. I added pool noodles to the grocery list, which caused the DH some head scratching moments when he was out doing the shopping. In the meantime, I hit the local home improvement store and picked up some 7 foot pre-primed trim boards.  I went with the seven foot length, as they will fit into my truck easily.  I also grabbed some wood dowel rods to put into the center of the pool noodles for stability sake.

Supplies in hand, I head to the Michigan House so that in the event of an epic failure, I could always fall back on the floor. Literally. I also brought along a 3 x 6 foot table to layer on & a large roll of painters tape, again just in case I ended up on the floor.

Since I had three quilts that needed to be layered, I started with the Construction Equipment quilt, so I could work out the kinks.  Of all the current projects, this would be the most forgiving to work on - large pieces with fewer seams. Very straight forward indeed.

Based on the 64 x 84 inch size of the top, I started with the board method.  In the video, they recommend starching the heck out of both the top and backing.  Nope - that's a definite no-go on the two large quilts.


It worked fairly well.  I did notice a tiny bit of backing fabric distortion as I rolled it up.  I wonder if my boards have a slight warp to them. I did eyeball them when I purchased them but I'll need to check them against a level.  The DH has offered to round over the sharp edges so they match the beveled edges.

The two large quilts got layered.  The third - the Solstice Quilt - was still in process of being pieced.  When it's done, I'm planning on trying out the pool noodles for layering that one as it only measures 21 x 24 inches.  It has a TON of seams so it will be a different experience.

But all in all, I'm OFF the floor!!  Now I need to find a fun, new laptop skin.


Thursday, June 8, 2017

This Blog Has Been Rudely Interrupted

By the untimely demise of my trusty, Toshiba laptop. 
After seven years of faithful service, it is worn out and ready for retirement. 

And I need to find a suitable replacement. ARGH!!!
Normally, my shopping maven gene kicks right in and off I go. This will be a little trickier. 

I do have it narrowed down so hopefully I'll be back to blogging very, very soon. Things have been happening in the studio! And I'm anxious to share them.
See you all soon!
Cherry